Tin Foil Piano with the Microbit
Elementary Music (Microbit)
In this activity, we will measure a change in current between the Micro:bit and ground, calculate a note by its frequency, and play the note.
Activity
The Micro:bit has a number of "pins" along the bottom surface of the board; these are metallic surfaces labeled P0, P1, and P2. There are also surfaces that supply three volts of power (labeled 3V), and an electrical "ground" (labeled GND). By sending current to these pins, we can transmit information and read sensor data to and from the outside world. Today, we will use our own body to direct that current to pin P1 of the Micro:bit, and play sounds on a speaker. We will also explore how sounds are generated, and how they can be manipulated to play any note we want!
Getting Started
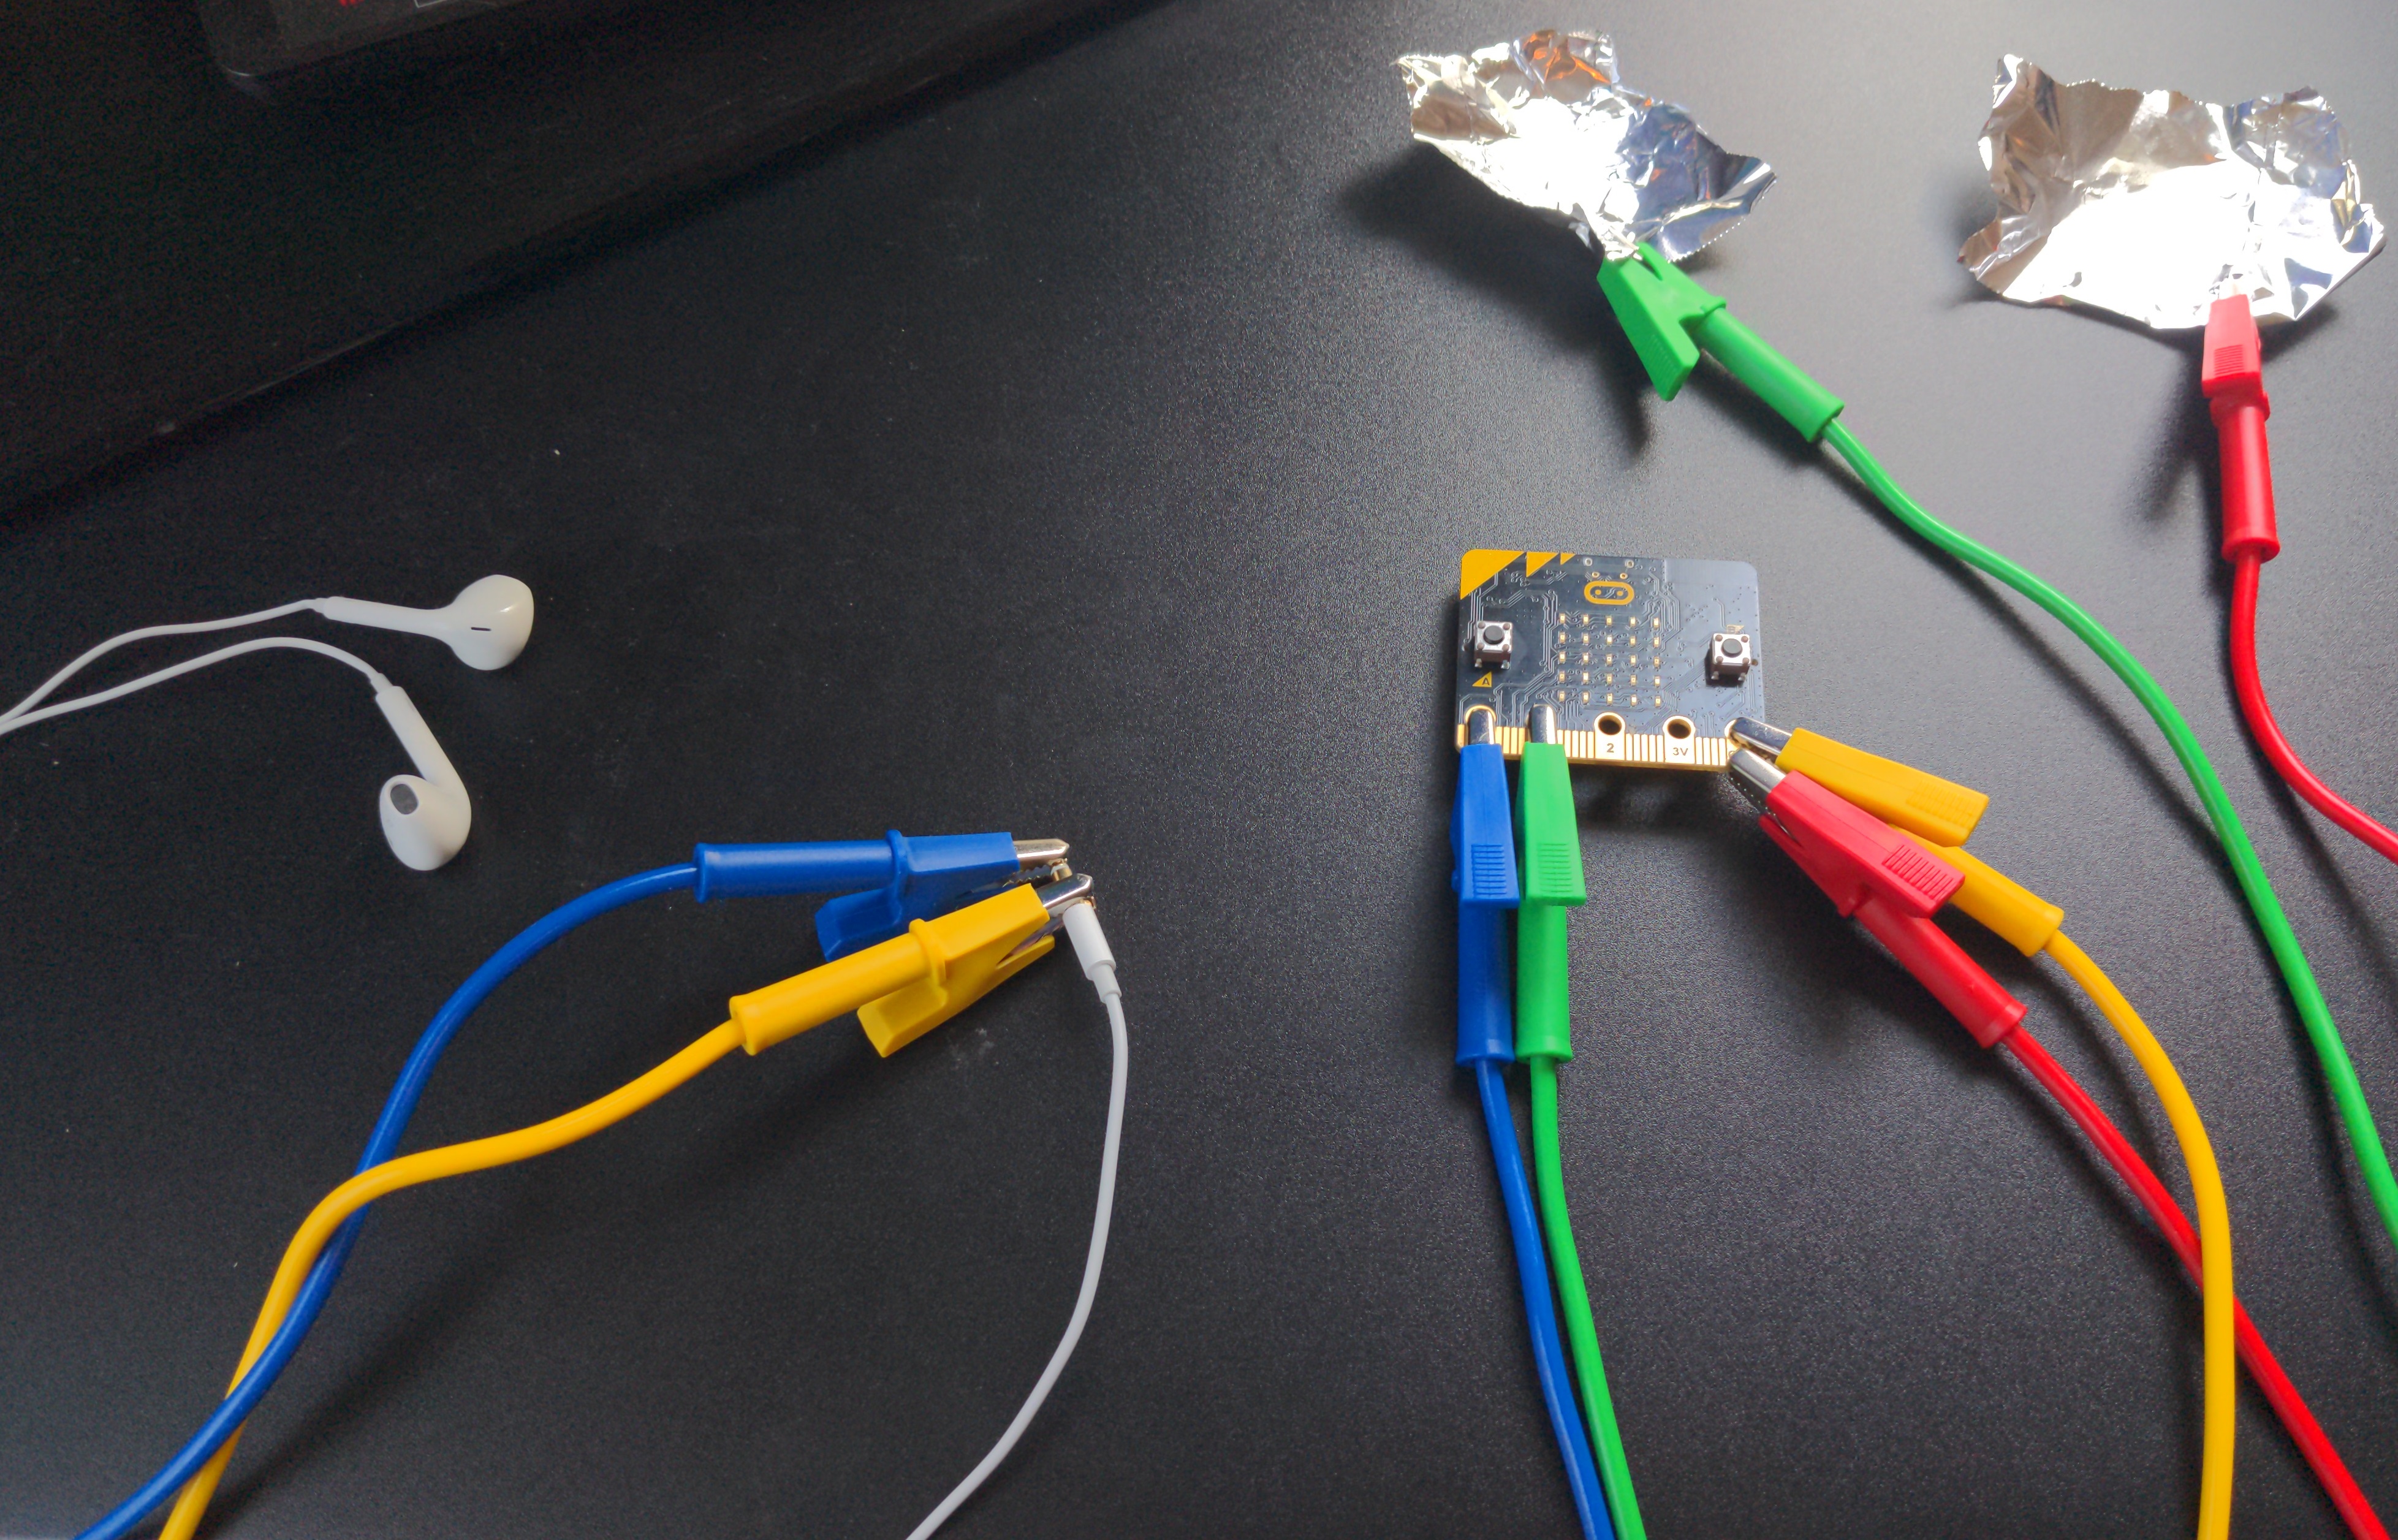
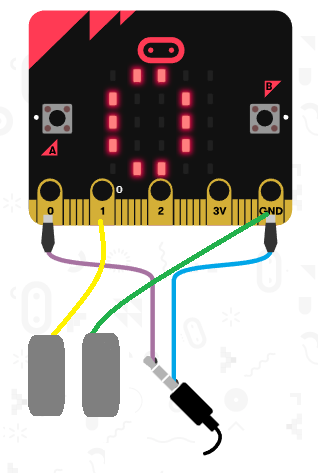
First, we’ll need three pieces of equipment for this project: a speaker or set of headphones, two pieces of tin foil, and 4 allegator clips to connect the headphones and the pieces of tinfoil to the Micro:bit. We’ll connect one allegator clip to P0, and connect the other end to the tip of the headphone jack for the spaeker. Another clip will connect ground (GND) to the bottom or back of the headphone jack. The other 2 allegator clips will go on the each of the two pieces of tin foil. Connect one end to ground and the other to a piece of tin foil, and one end of the other to P1 and the other end to the other piece of tin foil. This is all shown in the figure below, adapted from the Micro:bit MakeCode interface.
Playing a Sound
At the Micro:bit MakeCode page, create a new project.
Our first goal is to play a sound when the tin foil "piano key" is pressed. This will happen when you touch the ground tin foil with one hand, and then (while still touching the tin foil) touching the tin foil connected to P1 with the other hand. Micro:bit calls a code block for you whenever this happens, and it is called on pin P1 pressed. Drag this block to the code section.
In this block, we need one command: the play tone step. This step asks for two pieces of data: what note to play, and for how many beats. You can pick however many beats you like (I used 1 beat), and for the tone, let’s start with Middle A.
If you run this, every time you tap the P1 tin foil while holding the ground tin foil, you should hear a beat!
Changing the Sound
\(base \times {(2^{\frac{1}{12}})}^{step}\)
where base is some root note frequency, and step is the number of halfsteps (like piano keys keys) above or below that root note frequency. We can use our Middle A note as our root, which is 440 Hz. To simplify things and reduce the number of exponents in our project, we can use a rough value for \(2^{\frac{1}{12}}\):
\(base \times 1.05946309436^{step}\)
Create a variable called step1 to hold our step value, a variable called ConcertA which will hold the value 440 (our root note frequency), and a variable called TwoToTheOneTwelfth which will hold the value of 1.05946309436. In an on start block, set step1 to 0, ConcertA to 440, and TwoToTheOneTwelfth to 1.05946309436.
Let’s create another variable which will hold the frequency of the note we want to play. Call this frequency f1, and in on start, set it to the value of the ConcertA variable (we’ll start by playing the roote frequency note).
To change this frequency, we’ll change the step variable up or down by 1, and then compute the value of f1 according to our formula above. To do this, add a on button A pressed block and, within the block, add a step fo set step1 to step1 minus 1. Then, set f1 to ConcertA times (TwoToTheOneTwelfth raised to the power of step). The "power" operator is **.
For fun, add a step to show show arrow South within this block, so you’ll see that the note is getting lower, and add a show number step to display the value of f1, so that you can see what frequency you’ll play next time you touch the tin foil.
When you press the A button, and then play a sound using the tin foil like before, the sound should get deeper each time you press A. Repeat this process to increase step by 1 whenever the B button is pressed (and to show the North arrow instead of South since the note will get higher!).
Simplifying the Code with Functions
What is the most complicated part of the program? Chances are, you said it was doing the math to calculate the value of f1 every time you press a button. You did this twice (for the A button and for the B button), so you had to repeat yourself a bit. We can avoid this using a function. Functions allow us to define a group of steps and turn them into a single step that we can use anywhere we want.
Create a function (I called mine calculateFrequencies), and move the set f1 to and show number f1 steps to it. In your button A pressed and button B pressed steps, replace the set f1 to and show number f1 steps with a call calculateFrequencies step. Now you just have to do the complicated work of setting f1 once, and use it everywhere you need it!
The Finished Project
Here’s my finished product, available at https://www.billmongan.com/tin-foil-piano/:

Follow-Up
More Notes?
How might you add a second note to the piano? You’ll need one more piece of tin foil and one more allegator clip pair (you can re-use the ground connection!).
Setting the Beat
You can add a block so that when the A+B buttons are pressed together, you set a variable called beat to vary the length of the played note. To do this, create a variable beat and set it to 1 in on start. Every time A+B is pressed, set beat to the value of beat plus 0.125 (one eighth note). In the play tone step, change 1 beat to the variable beat. The note should get longer next time you play!
What’s the problem with this? If you want the beat to play faster, you have to restart the whole program! What can we do about that? One solution is to "wrap around" the value of beat back to a small number once in a while. Add an if block to the on button A+B pressed to check if the value of beat is greater than 2. If it is, set it to 0.125.
A Musical Connection
What do you notice about the sound as the frequency gets higher (when you press B)? How about when the frequency gets lower (when you press A)? The pitch gets higher as the frequency increases, and lower as the frequency decreases.
Take a piece of string and pluck it; then take a longer string and pluck it. Does the longer string appear to vibrate faster or slower? Does the sound get higher or lower? How about for a shorter piece of string?
How do you think guitars and pianos decide what length of string to use to make each sound? Look up these note frequency values to see what notes you’ve been playing using the tin foil, based on the frequency values shown on the display!